This post may contain affiliate links. We may receive a commission for purchases made through these links, at no extra cost to our readers. Lean more in our Privacy Policy. Thank you for your support!
First I have to admit-stitching is not for everyone. It requires a lot ( and I mean A LOT) of patience. However, it is really worth it, because even a small handmade embroidery makes any regular denim piece a unique fashion element. Even a small embroidery will not stay unnoticed.
Choosing the Perfect Canvas: Selecting the Right Denim
Embarking on an embroidery journey requires the right denim canvas. Explore various denim types, weights, and finishes to ensure your embroidery project starts on the right stitch.
- Consider Weight and Texture: Opt for a mid-weight denim with a tight weave for most projects. This provides durability without being too challenging to work with.
- Inspect Stretch Content: check the stretch percentage of the denim. A slight stretch (around 1-3%) is ideal for comfort and ease of movement. However, projects like embroidered patches or intricate designs may benefit from non-stretch denim, providing a stable surface.
Essential Embroidery Supplies
Embroidery Hoop: Select a hoop that comfortably fits the size of your chosen design. This helps to keep the fabric taut and facilitates easier stitching.
Choose a hoop with a tightening screw for secure adjustment. Choose a hoop made of durable materials like wood or plastic. Avoid hoops with rough or unfinished edges that could snag the denim.
Embroidery Needles: Use needles with a larger eye for easy threading. For denim, a medium-sized embroidery needle (around size 5-10) works well.
Ensure the needle is sharp enough (and not bent) to effortlessly pass through the denim fibers. A sharp needle makes clean punctures through the denim, while a bent one may snag or damage the fabric.
Embroidery Floss: Opt for embroidery floss in your desired colors. Separate the strands according to your project needs; for denim, using 2-4 strands is often suitable. Consider colorfastness if your project might be subjected to washing.
Scissors: Have a sharp pair of embroidery scissors for precise cutting of the floss. A small, pointed tip allows for easy trimming close to the fabric.
Fabric Marker or Pencil: Use a water-soluble fabric marker or a pencil for sketching your design directly onto the denim. This makes it easier to follow the pattern while stitching.
Opt for a high-quality fabric marker or pencil to avoid residue or marks on the denim after stitching. Test on a scrap piece of denim first to ensure it washes out easily.

Embroidery Techniques
Time to bring your denim canvas to life with stitches! Here’s a brief rundown of some common stitches:
Backstitch: Ideal for outlining and creating fine lines. Beginners find it easy to grasp, making it a versatile choice for various designs.
Running Stitch: A basic and versatile stitch whcih is perfect for straight lines or creating dashed patterns. It’s easy to master, making it beginner-friendly.
Split Stitch: Similar to the backstitch, the split stitch involves passing the needle up through the center of the previous stitch. This creates a textured line, suitable for outlining and adding dimension.
Satin Stitch: Excellent for filling shapes and creating a smooth, solid surface. Although it requires precision, beginners can practice and master it for beautiful, polished results.
Chain Stitch: Known for its looped appearance, the chain stitch is great for creating textured lines or decorative borders. It’s beginner-friendly and adds a charming, handcrafted touch.
French Knot: A small, textured knot often used for embellishments. While it might take some practice, beginners can achieve delightful results with this stitch.
Lazy Daisy Stitch: Perfect for creating flower petals or leaves, the lazy daisy stitch involves making a loop and securing it with a small stitch. It’s simple yet adds a whimsical element to designs.
Cross Stitch: Involves creating X-shaped stitches to form a pattern. While it requires counting and careful spacing, it’s a staple for creating intricate designs and suitable for beginners.

For beginners, starting with straightforward stitches like the backstitch, running stitch, and chain stitch is recommended. As confidence grows, experimenting with more intricate stitches like the satin stitch or French knot can lead to stunning embroidered creations.
Beginner Friendly Stitching Designs
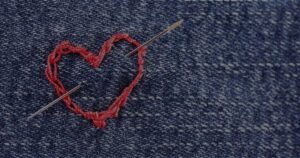
Heart Outline: Start by anchoring your thread with a secure knot at the desired starting point. Use the backstitch to create the outline of a heart. Begin by inserting the needle from the back to the front, pull it through, and then insert it back down slightly ahead, keeping your stitches evenly spaced for a clean heart shape.
Starry Night: Embellish your denim canvas with a starry night using tiny French knots. Bring the needle up through the fabric, wrap the thread around twice, and carefully insert it back close to the starting point. Experiment with different-sized knots to achieve a celestial and captivating night sky.
Floral Bliss: Enliven your denim with dainty flowers using basic satin stitches. Select vibrant thread colors, and vary the stitch length to create a diverse and eye-catching floral arrangement. To make a satin stitch, insert the needle at one end of the petal, bring it up on the opposite side, and repeat, ensuring the stitches lie close together.
Pawfect Pet: Add a playful touch to your denim by embroidering a paw print using easy straight stitches. Begin with a single straight stitch to represent a toe, and then add additional stitches to form the paw. Experiment with different colors to capture the essence of your beloved pet.
Wave Pattern: Achieve a dynamic wave-like effect with chain stitches. Start at one end of the wave, bring the needle up, and loop the thread back through, forming a chain. Vary the stitch length to capture the ebb and flow of ocean waves on your denim canvas.
Minimalist Mountains: Outline mountains with uncomplicated backstitch for a nature-inspired design. Insert the needle at the base, create small stitches to form the peaks, and continue until you’ve outlined the mountain range. This minimalist design is perfect for nature enthusiasts.
Radiant Sun: Craft a sun motif with straightforward seed stitches. Scatter small, random stitches across a designated area to mimic the texture of the sun. Experiment with stitch density to create a radiant sunburst effect.
Crescent Moon: Capture the crescent shape of the moon using basic stitches. Start with a small straight stitch at the base, gradually increasing the length to form the curve of the crescent. Experiment with shades of blue or silver thread for a moonlit night effect.
Whimsical Clouds: Embroider fluffy clouds using the seed stitch. Scatter small, random stitches across the fabric to create a cloud-like texture. Adjust stitch density for a dreamy appearance that adds a touch of whimsy to your denim.
Geometric Shapes: Experiment with triangles, squares, and circles for a modern touch. Play with different arrangements and sizes to create a contemporary and eye-catching design. Use simple straight stitches to outline each shape, allowing for endless creative possibilities.

Finishing and Caring for Embroidered Denim
Securing Loose Threads: Before considering any washing or wearing, carefully inspect your embroidered denim for loose threads. Secure loose ends by weaving them back through the stitches on the reverse side. This ensures a neat finish and prevents unraveling.
Gentle Handwashing: To preserve the vibrant colors of your embroidery, opt for gentle handwashing rather than machine washing. Use a mild detergent or soap specifically designed for delicate fabrics. Turn your denim inside out to protect the embroidery during washing. Wash your embroidered denim in cold water to prevent both color bleeding and potential damage to the delicate stitches.
Air Drying: After washing, avoid using a tumble dryer. Instead, lay your denim flat on a clean, dry towel to air dry.
Ironing Precautions: If ironing is necessary, turn your denim inside out to protect the embroidery.
Pingback: Denim Renaissance: DIY Stylish Jeans from Old Denim
Pingback: Jeanius Bags: Upcycled Denim Accessories